2 Mayıs 2014 Cuma

Basic Qt Applications: QPainter Application

The QPainter class performs low-level painting on widgets and other devices. Today, I will show you how to paint on a child widget of the mainwindow by using QPainter. Painting on a child widget will lead us to paint on a defined area in our mainwindow. Otherwise, once the program is initialized the paint event will paint on the mainwindow widget which is not desired in our applications.

In order to paint on a child widget, first we have to create a widget class. Please, follow the below mentioned steps to add a new widget class to your project.

1. Right click to your project folder and choose the "Add New".


2. In the opening window choose the "Qt" from Files and Classes section and choose the "Qt Designer Form Class"
3. Click the "Choose" button.


4. In the opening window, choose the "Widget" from templates\form section and then click the next button.

 
5. Name your widget class.


We named our new widget class as "painthere". Thus, the Qt Creator will add painthere.cpp, painthere.h and painthere.ui files to our project.

Our paintings will be done on this newly created widget class by implementing the paint event function in this newly created class. Then an object of this class will be created as a child widget in the mainwindow.cpp file.

Here, as an example we will first create a sine in the "gen_sine()" function of the class painthere. Then, the generated sine will be painted in the "paintEvent" function of the painthere class. The "painthere.h" and "painthere.cpp" files are given below.

painthere.h

#ifndef PAINTHERE_H
#define PAINTHERE_H

#include <QWidget>
#include <QPainter>
#include <QPaintEvent>
#include <QtMath>
#include <QList>
#include <QDebug>
#include <QPalette>

namespace Ui {
class painthere;
}

class painthere : public QWidget
{
    Q_OBJECT

public:
    explicit painthere(QWidget *parent = 0);
    ~painthere();

protected:
    void paintEvent(QPaintEvent *event);

public slots:
    void gen_sine();

private:
    Ui::painthere *ui;
    QList <float> sine_signal; // the list including the sine function values
};


#endif // PAINTHERE_H


painthere.cpp

#include "painthere.h"
#include "ui_painthere.h"

painthere::painthere(QWidget *parent) :
    QWidget(parent),
    ui(new Ui::painthere)
{
    ui->setupUi(this);

}

painthere::~painthere()
{
    delete ui;
}

void painthere::paintEvent(QPaintEvent *event){

    int i,j;
    float y, ynext, ymax = 1.0, ymin = -1.0;
    QPainter painter(this);
    qDebug() <<"Paint Event"; // debugging

    painter.eraseRect(0,0,this->width(),this->height()); // first the window is erased
    painter.setPen(Qt::blue);


    // screen coordinates must be converted into real coordinates
    for (i = 0;i < sine_signal.length()-1;i++)
    {
        y = 250*(ymax - sine_signal.at(i)) / (ymax - ymin);
        ynext = 250*(ymax - sine_signal.at(i+1)) / (ymax - ymin);
        painter.drawLine(i, y, i, ynext);
    }

    // grid screen
    painter.setPen(Qt::black);
    for (i = 0;i < this->width(); i += (this->width()) / 25)
        for (j = 0;j < this->width(); j += (this->width()) / 25)
        painter.drawPoint(j,i);

}

void painthere::gen_sine(){

    int i;

    sine_signal.clear();

    for (i = 0;i < 500;i++){
        float s = 0.8*sin(2*3.14*i/25) + 0.003 * (qrand() % 20); // a small noise is added to create a flowing signal
                                                                 // effect in the window
        sine_signal.append(s);
    }

}


Once the painthere class is implemented, an object of this class is generated in the mainwindow.cpp file. Since the painthere class is a widget class, this newly generated object will create a new plotting area where our implemented sine function will be plotted. The mainwindow.h and mainwindow.cpp files are given below.

mainwindow.h


#ifndef MAINWINDOW_H
#define MAINWINDOW_H

#include <QMainWindow>
#include <painthere.h>
#include <QTimer>


namespace Ui {
class MainWindow;
}

class MainWindow : public QMainWindow
{
    Q_OBJECT

public:
    explicit MainWindow(QWidget *parent = 0);
    ~MainWindow();


private slots:
    void on_pushButton_clicked();

    void on_pushButton_2_clicked();

private:
    Ui::MainWindow *ui;
    painthere *pp; // a painthere pointer 
    QTimer *timer;

};

#endif // MAINWINDOW_H


mainwindow.cpp

#include "mainwindow.h"
#include "ui_mainwindow.h"


MainWindow::MainWindow(QWidget *parent) :
    QMainWindow(parent),
    ui(new Ui::MainWindow)
{
    ui->setupUi(this);

    pp = new painthere(this);
    pp->setGeometry(200,100,500,250);
    pp->setAutoFillBackground(true);
    pp->setBackgroundRole(QPalette::Light);
    pp->show();

    timer = new QTimer(this);
    connect(timer,SIGNAL(timeout()), this, SLOT(on_pushButton_clicked()));
}

MainWindow::~MainWindow()
{
    delete ui;
}


void MainWindow::on_pushButton_clicked()
{

    pp->gen_sine();
    pp->update();

    timer->start(1000);

}

void MainWindow::on_pushButton_2_clicked()
{
    timer->stop();
}


An output of the resulting application is also given below.


17 Mart 2014 Pazartesi

Basic Qt Applications: QLCDNumber Application

Our first application was a basic QTimer application in which it is aimed to show the way of doing a certain task periodically by using a timer.

In this application, QTimer, QLCDNumber and QTime classes are used to implement a digital clock using an lcd digital format.

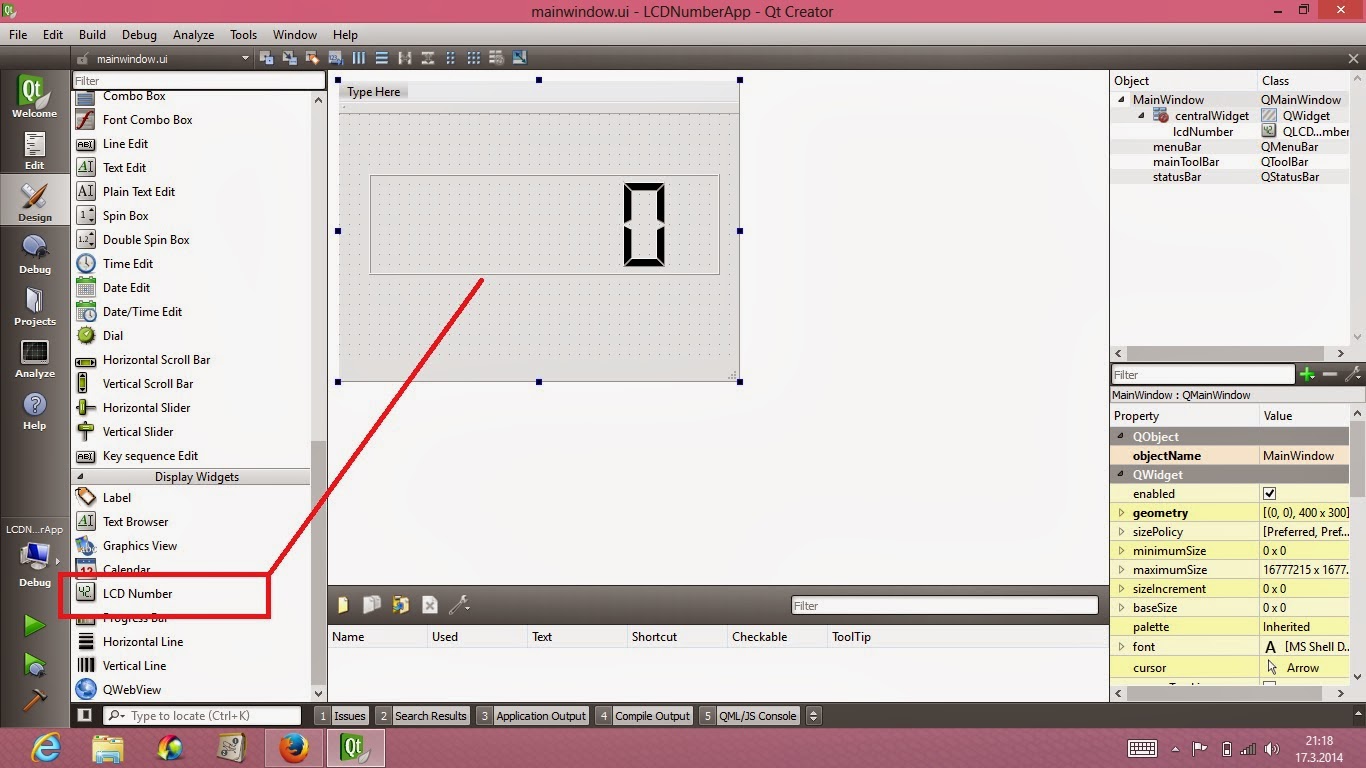
For this purpose, a display widget "LCD number" is inserted to the centralWidget as shown in figure.

By default Qt names the QLCDNumber object as "lcdNumber". Thus, we do not need to create a new
QLCDNumber object again.

Since we want to implement a digital clock we must include the <QTime> class and create a QTime object to access currentTime() function. The currentTime() function is used to get the current system time. However, in order to implement a digital clock we must access and display the current time periodically for every second. Thus, we will create a timer as in the QTimer application and call the myFunc() function as a slot to display the current time in the lcdNumber object.

mainwindow.h and mainwindow.cpp files are given below.

#ifndef MAINWINDOW_H
#define MAINWINDOW_H

#include <QMainWindow>
#include <QTime>

namespace Ui {
class MainWindow;
}

class MainWindow : public QMainWindow
{
    Q_OBJECT

public:
    explicit MainWindow(QWidget *parent = 0);
    ~MainWindow();

private slots:
    void myFunc();

private:
    Ui::MainWindow *ui;
};

#endif // MAINWINDOW_H
 
 
#include "mainwindow.h"
#include "ui_mainwindow.h"
#include <QTimer>
#include <QLCDNumber>
#include <QTime>

MainWindow::MainWindow(QWidget *parent) :
    QMainWindow(parent),
    ui(new Ui::MainWindow)
{
    ui->setupUi(this);

    QTimer *timer = new QTimer(this);
    connect(timer, SIGNAL(timeout()), this, SLOT(myFunc()));
    timer->start(1000);
}

MainWindow::~MainWindow()
{
    delete ui;
}


void MainWindow::myFunc()
{
    QTime t;
    ui->lcdNumber->setDigitCount(8);
    ui->lcdNumber->setSegmentStyle(QLCDNumber::Flat);

    ui->lcdNumber->setStyleSheet("color: green;"
                                 "background-color: white");

    ui->lcdNumber->display(t.currentTime().toString());

}

Some lcdNumber parameters such as text color and background color are set in myFunc() by using the following code pair. In order to view digital clock properly, lcdNumber digit count number must also be set to 8 for hh:mm:ss form.

    ui->lcdNumber->setDigitCount(8);
    ui->lcdNumber->setSegmentStyle(QLCDNumber::Flat);
    ui->lcdNumber->setStyleSheet("color: green;"
                                 "background-color: white");

Program output can be seen from the figure below.

16 Mart 2014 Pazar

Basic Qt Applications: QTimer Application

This blog provides some application examples of Qt classes. As a first application "QTimer" class is used to show how to make a job peridocally by using a timer.

Examples are implemented in the Qt version of Qt 5.2.1 for Windows 32-bit (MinGW 4.8, OpenGL, 634 MB).  

QTimer Application

#ifndef MAINWINDOW_H
#define MAINWINDOW_H
 
#include <QMainWindow>
 
namespace Ui {
class MainWindow;
}
 
class MainWindow : public QMainWindow
{
    Q_OBJECT
 
public:
    explicit MainWindow(QWidget *parent = 0);
    ~MainWindow();
    void callTimer();
 
private slots:
    void myFunc();
 
private:
    Ui::MainWindow *ui;
};
 
#endif // MAINWINDOW_H


#include "mainwindow.h"
#include "ui_mainwindow.h"
#include <QTimer>
#include <QDebug>

MainWindow::MainWindow(QWidget *parent) :
    QMainWindow(parent),
    ui(new Ui::MainWindow)
{
    ui->setupUi(this);
    callTimer();
}

MainWindow::~MainWindow()
{
    delete ui;
}

void MainWindow::callTimer(){
    QTimer *timer = new QTimer(this);
    connect(timer, SIGNAL(timeout()), this, SLOT(myFunc()));

    timer->start(1000);

}

void MainWindow::myFunc(){

    qDebug() << "Debugging is in progress...";
}


mainwindow.h and mainwindow.cpp files are respectively given above. Once a QTimer is created its timeout() signal should be connected to the appropriate slots. Slots can be considered as the functions that will be invoked after a timer call. Here, we define the myFunc() function as a slot which will be called periodically to perform some job. That's why in mainwindow.h file myFunc() is defined as a slot as shown above. 

In mainwindow.cpp file the callTimer() function is called in the constructor function of the MainWindow class. callTimer() function creates a timer object by using the following code pair.


QTimer *timer = new QTimer(this); 


To create a QTimer object in the mainwindow.cpp file the <QTimer> library must be included. Once a timer object created its timeout() signal is connected to the myFunc() function with the following code pair.
connect(timer, SIGNAL(timeout()), this, SLOT(myFunc()));

Here myFunc() can be any function that addresses your requirements. As an example, in this function a text is printed out by using another Qt class QDebug. Thus, it will be possible to observe if the timer is working properly or not. Please do not forget to add <QDebug> library to the mainwindow.cpp. Otherwise, qDebug() function will not be identified by the compiler.


timer is started by calling the start() function of QTimer class. The start() function asks the duration in milliseconds as a parameter from the user. Here, as it can be shown above, we passed start(1000) which makes 1 seconds. This means, the timer will call the myFunc() function periodically for every second.